今回はECサイトに必須のFAQページのテンプレートを作成していきます。
FAQ用のページテンプレートを作成する
まず、通常のページ(固定ページ)とは別に、FAQ専用のページテンプレートを作成します。
この記事ではShopifyのデフォルトのテーマ「Debut」を使用します。
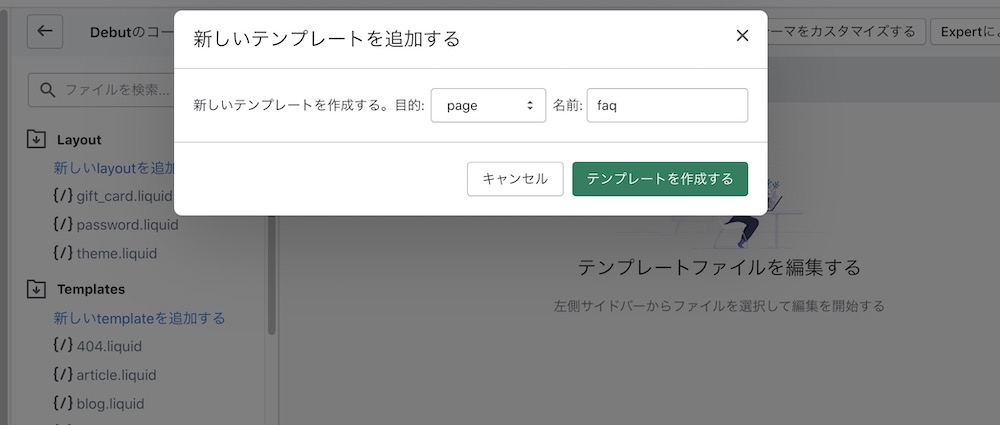
テーマのコード編集画面、templatesの「新しいtemplateを追加する」から、「page.faq.liquid」というファイルを作成します。
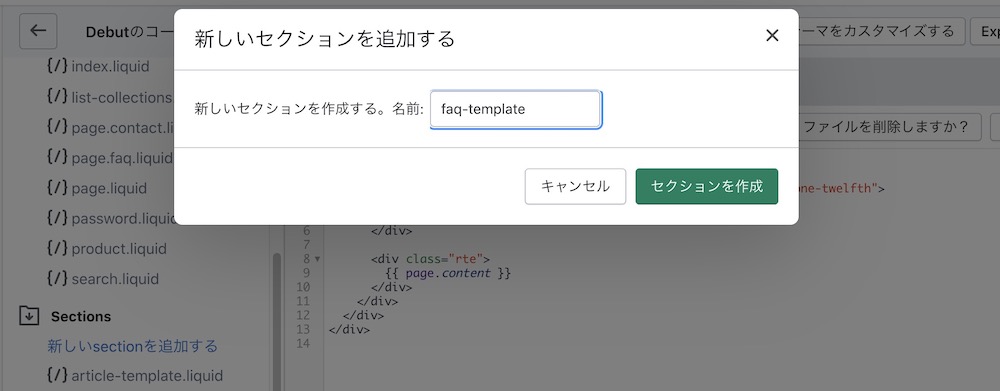
次に、今回は管理画面から質問の項目を編集できるようにしたいので、sectionsの「新しいsectionを追加する」から「faq-template.liquid」を作成しましょう。
faq-template.liquidを作成できたら、page.faq.liquidの中身を一旦全て削除して、faq-template.liquidを読み込みます。
{% section 'faq-template' %}こんな感じになっていればOKです。

作成したfaq-template.liquidにHTMLを追加する
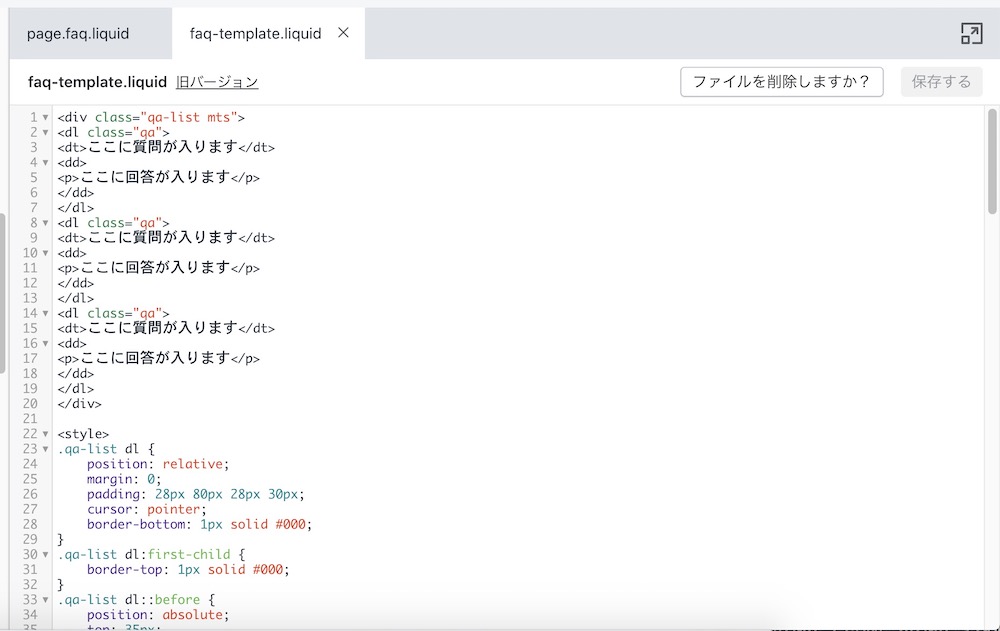
このままではfaq-template.liquidが空なので何も表示されないため、FAQを表示するためのHTMLを追加していきます。
今回はサンプルなので、こちらの記事で紹介されているコードをそのまま利用させて頂きます。
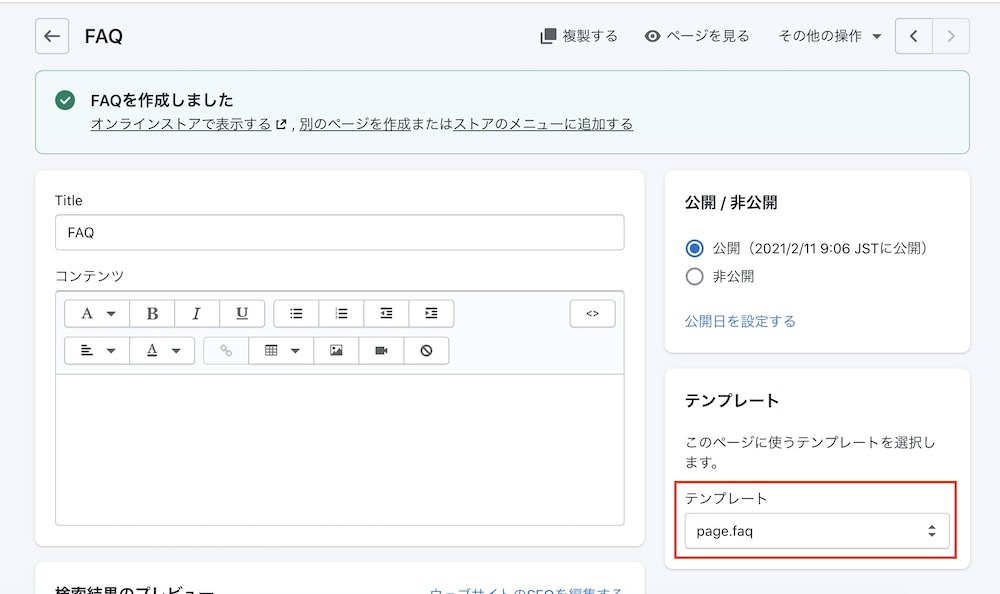
表示を確認するために「FAQ」というページを作って、先ほど追加したpage.faqのテンプレートを選択します。
サンプルそのままでDebutのテーマを使用していると、こんな感じで表示されるはずです。

念のためここまでのコードを貼っておきます。
<div class="qa-list mts">
<dl class="qa">
<dt>ここに質問が入ります</dt>
<dd>
<p>ここに回答が入ります</p>
</dd>
</dl>
<dl class="qa">
<dt>ここに質問が入ります</dt>
<dd>
<p>ここに回答が入ります</p>
</dd>
</dl>
<dl class="qa">
<dt>ここに質問が入ります</dt>
<dd>
<p>ここに回答が入ります</p>
</dd>
</dl>
</div>

<style>
.qa-list dl {
    position: relative;
    margin: 0;
    padding: 28px 80px 28px 30px;
    cursor: pointer;
    border-bottom: 1px solid #000;
}
.qa-list dl:first-child {
    border-top: 1px solid #000;
}
.qa-list dl::before {
    position: absolute;
    top: 35px;
    right: 35px;
    display: block;
    width: 7px;
    height: 7px;
    margin: auto;
    content: '';
    transform: rotate(135deg);
    border-top: 2px solid #000;
    border-right: 2px solid #000;
}
.qa-list .open::before {
    transform: rotate(-45deg);
}
.qa-list dl dt {
    position: relative;
    margin: 0;
    padding: 0 0 0 50px;
    font-weight: bold;
    font-size: 20px;
}
.qa-list dl dt::before {
    font-size: 22px;
    line-height: 1;
    position: absolute;
    top: 3px;
    left: 0;
    display: block;
    content: 'Q.';
    color: #3285bf;
}
.qa-list dl dd::before {
    font-size: 22px;
    line-height: 1;
    position: absolute;
    top: 3px;
    left: 2px;
    display: block;
    content: 'A.';
    font-weight: bold;
    color: #3285bf;
}
.qa-list dl dd {
    position: relative;
    display: none;
    height: auto;
    margin: 20px 0 0;
    padding: 0 0 0 50px;
}
.qa-list dl dd p {
    margin: 30px 0 0;
}
.qa-list dl dd p:first-child{
    margin-top: 0;
}

@media screen and (max-width: 767px) {
.qa-list dl {
    position: relative;
    padding: 15px 40px 15px 10px;
}
.qa-list dl::before {
    top: 20px;
    right: 20px;
    width: 7px;
    height: 7px;
}
.qa-list dl dt {
    padding: 0 0 0 30px;
    font-size: 14px;
}
.qa-list dl dt::before {
    font-size: 14px;
    top: 3px;
    left: 5px;
    content: 'Q.';
}
.qa-list dl dd::before {
    font-size: 14px;
    top: 5px;
    left: 5px;
    content: 'A.';
}
.qa-list dl dd {
    margin: 10px 0 0;
    padding: 0 0 0 30px;
    font-size: 14px;
}
.qa-list dl dd p {
    margin: 30px 0 0;
}
.qa-list dl dd p:first-child{
    margin-top: 0;
}
}
</style>

<script src="https://code.jquery.com/jquery-3.3.1.js"></script>
<script>
$(function(){
  $(".qa-list dd").hide();
  $(".qa-list dl").on("click", function(e){
    $('dd',this).slideToggle('fast');
    if($(this).hasClass('open')){
      $(this).removeClass('open');
    }else{
      $(this).addClass('open');
    }
  });
});

</script>

{% schema %}
  {
    "name": "Section name",
    "settings": []
  }
{% endschema %}
FAQの質問と答えを管理画面(カスタマイズ)から登録できるようにする
FAQを表示させるところまでできたので、次はそれぞれの質問の項目をテーマのカスタマイズから変更・追加ができるようにしていきます。
カスタマイズ項目はコードの一番下にあるschemaという部分で設定します。
先ほど追加したfaq-template.liquidのschemaを以下に書き換えます。
{% schema %}
{
  "name": "FAQ",
  "settings": [],
  "blocks": [
    {
      "type": "question",
      "name": "質問",
      "settings": [
        {
          "type": "text",
          "id": "question",
          "label": "質問タイトル"
        },
        {
          "type": "richtext",
          "id": "answer",
          "label": "答え"
        }
      ]
    }
  ]
}
{% endschema %}
“FAQ”という名前のセクションを定義して、質問タイトルとその答えを繰り返し出力するための設定をblocksに書いています。
typeはtextやrichtext(リンクを作ったり太字にしたりできる)だけでなく、imagepicker(画像)なども設定できます。
次にここで設定した内容をページ上に出力するための記述を追加します。
先ほど追加したHTMLの不要な箇所を削除して、ループする部分(dl)を一つだけにします。その後、質問の見出しと答えの部分にカスタマイズ画面で入力した内容を出力するための記述を追加すればOKです。
<div class="qa-list mts">
  {% for block in section.blocks %}
    <dl class="qa">
      <dt>{{ block.settings.question }}</dt>
      <dd>
       <p>{{ block.settings.answer }}</p>
      </dd>
    </dl>
  {% endfor %}
</div>
具体的にはこんな感じ。
{% for block in section.blocks %}~{% endfor %}
先ほど設定したblockの内容を繰り返すための記述です。
(複数の質問を設定したら、その分だけ出力されるようになります。)
{{ block.settings.question }} {{ block.settings.answer }}
それぞれ質問の見出しと答えを出力するための記述です。
blockのsettingsに入力したquestion or answerを出力する・・という意味になります。questionやanswerといった部分は、schemaに設定したidと紐づいています。
実際に反映されているか見てみよう
テーマのカスタマイズから質問を追加できるようになっているはずですので、確認してみましょう。
テーマのカスタマイズ画面にいったら、上部のメニューから「FAQ」を選択します。
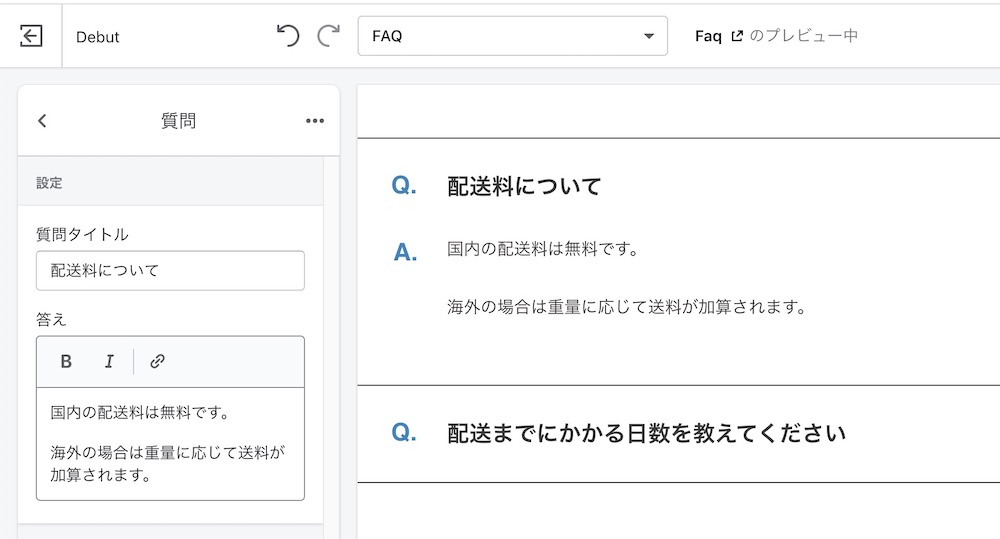
すると、先ほど設定した質問項目を追加するセクションが追加されているので、見出しと答えを入力して保存をすれば、ページ上に反映されるはずです!
サンプルコードはこちら
今回作成をしたテンプレートの最終的なサンプルコードを載せておきます。
page.faq.liquid
{% section 'faq-template' %}faq-template.liquid
<div class="qa-list mts">
  {% for block in section.blocks %}
    <dl class="qa">
      <dt>{{ block.settings.question }}</dt>
      <dd>
       <p>{{ block.settings.answer }}</p>
      </dd>
    </dl>
  {% endfor %}
</div>

<style>
.qa-list dl {
    position: relative;
    margin: 0;
    padding: 28px 80px 28px 30px;
    cursor: pointer;
    border-bottom: 1px solid #000;
}
.qa-list dl:first-child {
    border-top: 1px solid #000;
}
.qa-list dl::before {
    position: absolute;
    top: 35px;
    right: 35px;
    display: block;
    width: 7px;
    height: 7px;
    margin: auto;
    content: '';
    transform: rotate(135deg);
    border-top: 2px solid #000;
    border-right: 2px solid #000;
}
.qa-list .open::before {
    transform: rotate(-45deg);
}
.qa-list dl dt {
    position: relative;
    margin: 0;
    padding: 0 0 0 50px;
    font-weight: bold;
    font-size: 20px;
}
.qa-list dl dt::before {
    font-size: 22px;
    line-height: 1;
    position: absolute;
    top: 3px;
    left: 0;
    display: block;
    content: 'Q.';
    color: #3285bf;
}
.qa-list dl dd::before {
    font-size: 22px;
    line-height: 1;
    position: absolute;
    top: 3px;
    left: 2px;
    display: block;
    content: 'A.';
    font-weight: bold;
    color: #3285bf;
}
.qa-list dl dd {
    position: relative;
    display: none;
    height: auto;
    margin: 20px 0 0;
    padding: 0 0 0 50px;
}
.qa-list dl dd p {
    margin: 30px 0 0;
}
.qa-list dl dd p:first-child{
    margin-top: 0;
}

@media screen and (max-width: 767px) {
.qa-list dl {
    position: relative;
    padding: 15px 40px 15px 10px;
}
.qa-list dl::before {
    top: 20px;
    right: 20px;
    width: 7px;
    height: 7px;
}
.qa-list dl dt {
    padding: 0 0 0 30px;
    font-size: 14px;
}
.qa-list dl dt::before {
    font-size: 14px;
    top: 3px;
    left: 5px;
    content: 'Q.';
}
.qa-list dl dd::before {
    font-size: 14px;
    top: 5px;
    left: 5px;
    content: 'A.';
}
.qa-list dl dd {
    margin: 10px 0 0;
    padding: 0 0 0 30px;
    font-size: 14px;
}
.qa-list dl dd p {
    margin: 30px 0 0;
}
.qa-list dl dd p:first-child{
    margin-top: 0;
}
}
</style>

<script src="https://code.jquery.com/jquery-3.3.1.js"></script>
<script>
$(function(){
  $(".qa-list dd").hide();
  $(".qa-list dl").on("click", function(e){
    $('dd',this).slideToggle('fast');
    if($(this).hasClass('open')){
      $(this).removeClass('open');
    }else{
      $(this).addClass('open');
    }
  });
});

</script>

{% schema %}
{
  "name": "FAQ",
  "settings": [],
  "blocks": [
    {
      "type": "question",
      "name": "質問",
      "settings": [
        {
          "type": "text",
          "id": "question",
          "label": "質問タイトル"
        },
        {
          "type": "richtext",
          "id": "answer",
          "label": "答え"
        }
      ]
    }
  ]
}
{% endschema %}
ShopifyでFAQ(よくあるご質問)のページを作成する方法まとめ
今回はShopifyでFAQページを作成する方法をご紹介しました。
schemaを使いこなせるようになると、管理画面から様々な項目のカスタマイズができるようになるので、テーマを構築するなら必ず覚えておきたい内容ですね!
サンプルはDebutなどの無料テーマでいくらでも見ることができるので、Liquidに慣れてきたらいろいろいじってみると良いと思います。
